- Kundengruppe: Gast
-


- Registrieren
- Anmelden
- Mein Konto
- Startseite
- Details
- Mehr Bilder
Produktbeschreibung
Vielen Dank dafür. Wir freuen uns sehr über solche Zuschriften.Doch lesen Sie selbst:
Hier von einem GSO 680 Dobson 8" 200/1200mm Teleskop mit GoTo, das zur Sternwarte umgebaut wurde.
"Im Juli 2015 habe ich bei den Teleskop-Spezialisten den GSO 680 Dobson 8“ in der Variante „DeLuxe“ erworben. Ich bin sehr zufrieden mit diesem Kauf und habe viel Freude mit dem Gerät. Seither hat es eine Kette von „Upgrades“ erfahren und ist zum Kernstück meiner stationären „Ministernwarte“ geworden.Bei der Übergabe meines Dobson sagte Herr Kloss, dass das leichtgängige Azimuthdrehlager das Erste sei, was ich bald gegen ein Gleitlager tauschen wollen würde:
Es kam ganz anders.
Meine ersten, sehr preiswerten Änderungen waren das Anbringen von stabilen Tragegriffen links und rechts am Originaldobson und die Montage von vorerst drei Justierfüßen aus Kunststoff wie sie für die Aufstellung von Kücheneinbaumöbeln verwendet werden. So konnte ich das Stativ auch im feuchten und unebenen Gelände
transportieren, aufstellen und schnell ausrichten. Die Basisplatte blieb wegen der relativ hohen Füße auch auf nassem Rasen trocken.
Das von mir bei Ihnen erworbene „DeLuxe“ Stativ bietet horizontal wie vertikal sehr wertige mechanische Lager und weitere Teile, die das Anbringen einer sehr leistungsstarken und hochpräzisen Motorsteuerung mit einfachsten Mitteln ermöglichen. Das Ganze sollte auch bei einem Okularwechsel vom leichten NED 8mm 1 1/4“ mit 166g
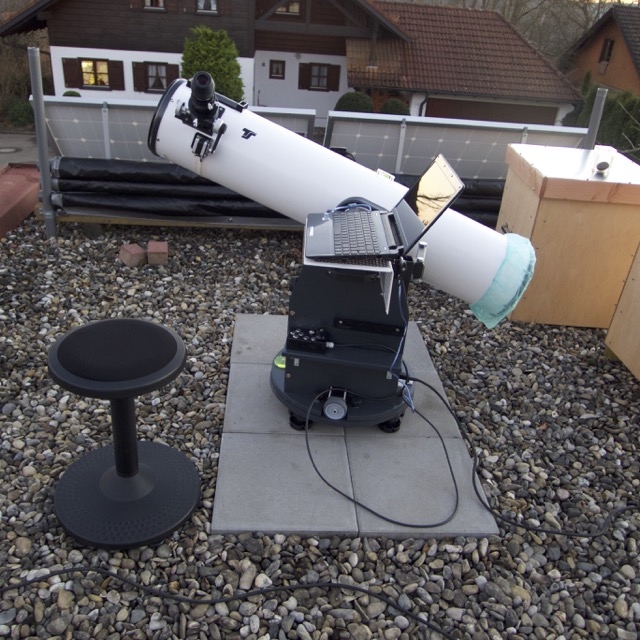 auf meine „Gravitationslinse“ Maxvision 34mm 68° 2“ mit 785g Gewicht sauber funktionieren. Leider bin ich werkstattmäßig nur als „besserer Heimwerker“ ausgestattet, dazu handwerklich nicht übermäßig begabt und mußte mir deshalb eine anspruchslose Machart ausdenken. Einzige externe Leistung: Da ich keine Drehbank besitze, hat ein Freund für mich zwei Kunststoffräder für die Azimuthverstellung auf Durchmesser 72,0 mm gebracht. Bei allen anderen Fertigungsschritten kam ich aber mit Stichsäge und Tischbohrmaschine aus.
Das Gerät ist dann von mir mit einem Materialaufwand von ≤ 350€ voll motorisiert worden.
Basis der Steuerung sind CNC-Komponenten wie sie bei ebay aus chinesischer Produktion heute unglaublich billig zu bekommen sind: Jede Achse hat zwei kraftvolle NEMA23 (76mm) Schrittmotoren und einen 4,5A Controller mit ≤ 256-fach Microstepping für den Parallelbetrieb dieser Motoren. Der Azimuth wird über zwei Reibräder direkt, die
Alt-Achse über zwei GT-2 Zahnriemen – jeweils 850mm lang – verstellt. Diese getriebefreien Achsantriebe wirken „kraftsymmetrisch“ und praktisch spielfrei. Die Motorfokussierung am Okularauszug ist mit einem kleinerem NEMA17 Motor und Controller mit nur ≤ 16-fach Microstepping realisiert. Die zusätzliche Motorfokussierung am
Okularauszug kostete nochmal ≤ 40€ zusätzlich.
Alle Komponenten der Steuerung und Motorisierung sind auf den Innenflächen des Stativs
montiert. Das Gesamtsystem ist kindersicher und nahezu „unkaputtbar“.
Zunächst wurde das Ganze für 230V Netzbetrieb gebaut. Der Betrieb, die Einrichtung und die Kalibrierung erfordern einen kleinen Netbook mit Win 7 oder 10, eine spezielle CNCSoftware und eine Steuerplatine mit Mikroprozessor, I/O für Motorentreiber, Handbox, NotAUS und USB-Anschluß.
Damit war zunächst die Steuerung des Telekops mit der Handbox und über Stufenschalter verstellbaren Geschwindigkeiten von „Jogging“ bis Feinnachstellung bei V=185x möglich.
Weil das motorisierte Teleskop recht schwer (ca. 30 kg) wurde und auf unserem Grundstück eh kein guter Platz für eine freie Rundumsicht existiert, habe ich es schließlich auf dem Garagendach stationär aufgestellt. Dafür wurde eine stabile Basis aus Zement-auf Styroporplatten (ca. 60€) über die Teerwanne gelegt und das Stativ mit vier der oben genannten Justierfüße fest auf vier der Platten mit insgesamt ca. 60kg Gesamtgewicht
gedübelt. Die Basisplatte des Dobson ist seither dauerhaft und sturmfest mit Hilfe einer großen Dosenlibelle mit maximal +/- 0,1° Abweichung horizontal ausgerichtet.
Das gelieferte Originalstativ ist kunststoffbeschichtet. Ich traute ihm aber wegen der unter der Beschichtung verwendeten grobkörnigen Spanplatten nicht zu, im „Außendienst“ dauerhaft der Witterung zu trotzen. Deshalb habe ich für die motorisierte Version am Ende eine Kopie aus wetterfest verleimtem 18mm Sperrholz angefertigt, diese imprägniert, mit Gartenmöbellack zweimal gestrichen und alle Komponenten umgesetzt (≤ 120€).
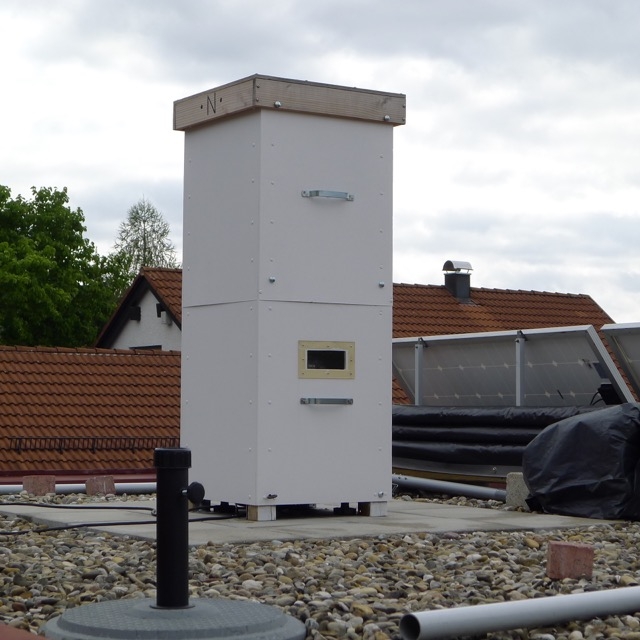
Viel Kopfzerbrechen hat mit die wetterfeste Einhausung des Teleskops auf dem Garagendach bereitet. Grillabdeckungen, Müllsäcke etc. wie im Web empfohlen wurden erprobt und versagten. Ein Anfang Dezember 2016 fertiggestellter Segmentturm aus wetterfestem Sperrholz (≤ 140€) schützt seither perfekt, läßt sich auch im Dunkeln problemlos handhaben und ist sturm- und diebstahlsicher mittels Bauwinkeln an die schweren Zementplatten gebunden. Das entscheidende Element aber ist eine wasserdichte Heizleiterfolie 10W/230V (15€) wie sie für Lurchis in Terrarien verwendet wird.
Diese wird nach dem Sternegucken direkt unter dem Hauptspiegel geschoben und sorgt für ständige Luftkonvektion im Turm. So bleibt bei JEDEM Wetter alles schön trocken. Die Stromkosten von 25€ p.a. für diese Dauerheizung ist mir mein Teleskop wert. Okulare, Filter, Netbook etc. hebe ich in einem separaten Alukoffer mit Schaumstoffeinsatz
 im Wohnhaus auf. Den Koffer hänge ich mir mit einem Schultergurt um, damit beide Hände frei sind wenn ich über eine HYMER Feuerleiter mit Rückenschutz und selbstgebauter Brückenplattform mit Geländer auf‘s Dach steige. Diese Komfortlösung war trotz einmaligem Sonderpreis mit fast 500€ inklusive 230V-Leitung das teuerste Stück
meiner Ministernwarte. Aber Senioren sollten nicht mehr über wackelige Leitern turnen und über die Randabdeckung des Flachdaches stolpern – schon gar nicht im Dunkeln ;-)
Schließlich lagen bei mir schon länger zwei kleine Solarpaneele aus einem Campingprojekt herum. Mein Sohn spendierte seinen gebrauchten STECA Solsum 8.8 Regler und schenkte mit zwei 12V Akkus für den 24V-Solarbetrieb zu Weihnachten.
Diese Lösung machte das lästige Netzkabel überflüssig. Die Sonne lädt die Akkus tagsüber für ca. 5-6 Stunden Dauerbetrieb auf. Mit einer Panzerkombi bekleidet habe ich auch im Winter über 2 Stunden bei -8° C gemütlich gespechtelt. Die neue Technik hatte bei diesen Temperaturen keinerlei Schwierigkeiten.
Ab jetzt kommen erst die richtigen Herausforderungen: Eine Software für GoTo und Nachführung zu schreiben. Dazu muß ich an diesem Beispiel die für mich neue Entwicklungssprache C# (Microsoft Visual Studio) erst einmal lernen. Bis jetzt habe ich nur eine kleine App für manuelles GoTo geschafft: Links oben in Stellarium lese ich die Position des Objekts ab, mit Hilfe einer kleinen unten rechts eingeblendeten App sehe ich die jeweils aktuelle Position und fahre das Teleskop mit der Handbox ins Ziel.
Nach einer ersten Kalibrierung erreiche ich so eine Abweichung ≤ +/- 0,2° am Himmel bei
der Positionierung. Das kann und wird noch deutlich besser werden."


Diesen Artikel haben wir am 11.09.2017 in unseren Katalog aufgenommen.
Profitieren Sie von unseren Erfahrungen als Teleskop-Spezialisten:
denn sehen heißt verstehen
in besonderen Fällen auch Vor-Ort-Service im Raum München

Infos / Tricks / Tipps »
Mehr auf Ihrer privaten Seite »

Die Box kann unter tpl_modified/boxes/box_miscellaneous.html verändert werden. Die Sprachvariablen befinden sich in der Datei tpl_modified/lang/german/lang_german.custom.